Easy Ways to Test Battery Voltage
Your vehicle’s battery is its lifeline. Without a functioning battery, you’re not going anywhere. Which means you should regularly check your battery’s charge to make sure it has enough juice to last you the next couple of months. Today, we’re going to show you an easy way to test your battery voltage.
Fortunately, this is a relatively simple task. If you have the right tools for the job, there’s no reason you can’t do it all by yourself.
Before We Start: Is the Alternator or Battery to Blame?
If you’re noticing some power issues and you’re concerned about the prospect of a dying battery, you should first run a couple of tests to determine whether the issue is with the battery or the charging system (the alternator) before spending a good chunk of change on something you don’t need.
What's An Alternator You Ask?
The alternator converts energy from the engine into alternating electrical current for the battery, which powers the vehicle’s electrical systems. So if it seems like your battery isn’t working, this is the first place you should look.
You can check on the health of your alternator in a few ways:
- After you’ve started your vehicle, turn on your headlights. If you discover that the lights are a little dim, then that could be an indication the lights are being powered primarily by the battery. In such a case, this means there is little or no charge being created by the alternator.
- With your headlights on, try revving the engine. If your lights shine brighter during the rev, it could mean that your alternator is producing some current, but not enough at idle to maintain a sufficiently charged battery. Conversely, if the brightness of the headlights doesn’t change intensity, your alternator is most likely working smoothly.
- If your interior lights are gradually dimming as the car is running, your alternator is likely to blame.
- If you remember hearing a slight growling sound coming from your vehicle before your things took a turn for the worse, that may be a clue that alternator is deteriorating.
Note: If you aren’t experiencing any of these symptoms, you should check your battery’s voltage.
Here are a couple of ways you can test your battery voltage yourself.
How to Test Your Battery Voltage with a Voltmeter
A simple method for checking your battery’s voltage involves using a voltmeter, which measures the electrical potential difference between two points in an electric circuit (in crude layman’s terms: voltage). We recommend you opt for a digital voltmeter as they are much easier to use.
For the most accurate reading, perform this test twelve hours after turning off your vehicle to give any surface charge a chance to dissipate.
- Make sure your vehicle is turned off.
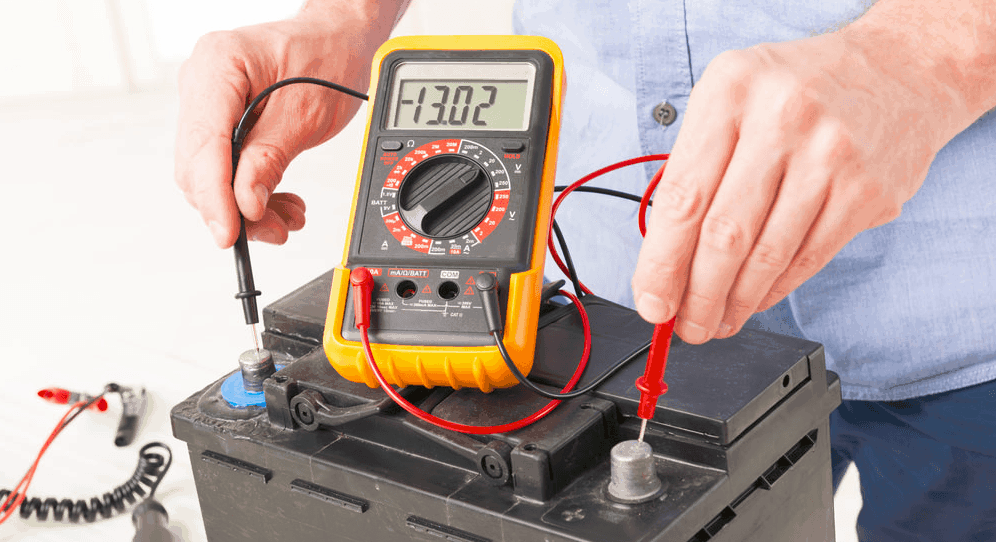
- Remove the battery’s positive terminal cover. Check the terminal for any corrosion and clean it off if necessary. You’ll then want to attach your voltmeter’s positive lead to the positive lead on your battery. After that, connect the negative voltmeter lead to the negative battery terminal following the same steps you did for the positive end. Now, you’re all set to check the voltmeter readings.
- Check the reading. A fully charged battery will typically display a voltmeter reading of about 12.6 to 12.8 volts. If your voltmeter is showing a voltage anywhere between 12.4 and 12.8, that means your battery is in good shape.
- Any voltage above 12.9 volts is a good indicator that your battery has excessive voltage. If that’s the case, turn on the high beams to drain excessive voltage surface charge. (Also, an excessive charge could mean that your alternator is to blame for an over charged battery.)
- Charge your battery if the voltmeter display a voltage below 12.4. But if you’re voltmeter is reading anything below 12.2 volts, you should consider “trickle charging” your battery. This essentially means that you would be charging your battery at a much slower rate, which allows you to avoid the risk of applying excess charge amperage that could cause a lot of excess heat and off-gassing (and in extreme cases, explosions).
A simple method for checking your battery’s voltage involves using a voltmeter, which measures the electrical potential difference between two points in an electric circuit (in crude layman’s terms: voltage). We recommend you opt for a digital voltmeter as they are much easier to use.
How to Do the Engine Cranking Method
Don’t get rid of your voltmeter, you’ll still need it for this test. Also, if you don’t have a remote starter, sit in the driver’s seat while you observe the voltmeter readings.
To check your car battery voltage using the “crank” method, connect the voltmeter to your battery following the same steps outlined above. Next, have a friend crank the engine for a few seconds while you keep an eye on the voltmeter. (By “crank” we mean starting your vehicle to energize the engine using an exterior force, like a remote starter (not a key). The name comes from the old days, when a literal metal crank was needed to manually turn an engine on.) Should the voltage read anything below 9.6 volts, that means the battery has become sulfated and is no longer retaining nor accepting the charge.
If you want, you can take this test a little further by disabling the ignition or injection to prevent your engine from starting. This will allow you to crank engine a little longer, but we suggest cranking no longer than 15 seconds. If you’re battery is properly charged, the voltmeter should show that it maintains a voltage of 9.6 volts or higher.
Other Methods
These are just two of the ways to measure your battery’s voltage, but they’re among the simplest and most cost effective methods.
If you’re still unsure of how things are done, or if you don’t have the confidence to do this yourself, remember that you can always book your vehicle for service check up at your local Go Auto location, we would be happy to help!